This step-by-step tutorial walks the reader through the development of a Minimum Viable Ethereum Mobile Wallet in React Native. It will be useful for folks who need a React Native boilerplate to base on to develop Ethereum-based blockchain apps.
Motivation
Ethereum DApps today require a digital wallet to execute transactions on the Blockchain. On the Chrome browser, MetaMask serves as the wallet. On mobile devices, Status does the job. But there are use cases that call for a self contained mobile app that interacts with a set of smart contract on the Ethereum blockchain or a private blockchain hosted on, say, Kaleido. An example could be a supply chain app that lets a group of buyers and sellers trade among themselves on the blockchain – a self contained app will probably provide a better user experience.
Thus my motivation for developing a React Native boilerplate that does the following:
- Let the user create his own wallet account with a Secure Storage for his private key
- Connect to an Ethereum node
- Import a wallet from elsewhere
- Receive and spend ETH from his wallet
- Run a smart contract
This Minimum Viable Wallet (MVW) will serve as starting point for developers who wants to build their own mobile blockchain app.
I started building MVW by referencing heavily to Doug Bacelar’s React Native Web3 Boilerplate. Later on, I added a couple of libraries from various other places.
Tutorial Structure
This tutorial will be presented in 4 parts.
- Part 1: For folks who just want to test MVW, keep reading. I will write about how MVW works.
- Part 2: For folks who want to build an MVW from codes, I will explain how it is done and the libraries that I used.
- Part 3: I will explain the codes behind wallet account creation and private key storage
- Part 4: I will walk through the codes for reading from and running a smart contract within the app
I will keep adding new parts as I write them. So check back often.
Running MVW
To run MVW, visit https://expo.io/@jacksonng/test. Then follow the instructions on the screen to either emulate the app on your web browser or download the Expo app on your mobile device to run it there.
Here’s how it looks like once you are in.
Press [Create Account] to generate your own wallet address and its private key.

You now need to fund your wallet with ETH. I have hard-coded MVW to connect to the Ropsten testnet using the Infura infrastructure.
To fund your wallet, open MetaMask and transfer some ETH from your MetaMask wallet to this new wallet address. Here’s a nice tutorial on MetaMask usage. Do remember to switch your network from Mainnet to Ropsten on MetaMask because MVW connects to the Ropsten testnet where ETH are free.
To get your free ETH on the Ropsten testnet, just go here.
In the screen captures below, I sent 1 ETH from my MetaMask wallet to the MVW app’s wallet address.

At this point you probably want to make sure that MVW has received the ETH that you sent to it.
Select “Contract” from MVW’s side menu. I have hard-coded MVW to access the smart contract here on the Ropsten network. This is a simple “Hello World” contract that changes a string of text based on what your provide. I have posted the codes to this contract here for reference.
This is just an example to illustrate how you can read from and write to a Smart Contract on the blockchain with MVW. The smart contract that you will execute in a real life scenario is likely to be much more complex.
Notice that it says “1” at Wallet balance. That’s because I have transferred 1 ETH from my MetaMask account to this new wallet address.
Go ahead to update the string. It takes around 5 to 15 seconds for the Smart Contract to save the new string. You can review the transaction on the Ropsten Etherscan explorer to see how the transaction gets written to a new block whenever you press [Save].

You can import an existing Wallet, for example, one that was created in MetaMask. Select “Properties” from MVW’s menu.
Here, you can change the address of the “Hello World” contract.
You can also export a MetaMask wallet by taking its wallet address and private key and pasting it here.

Here’s how to export a MetaMask wallet’s to MVW.
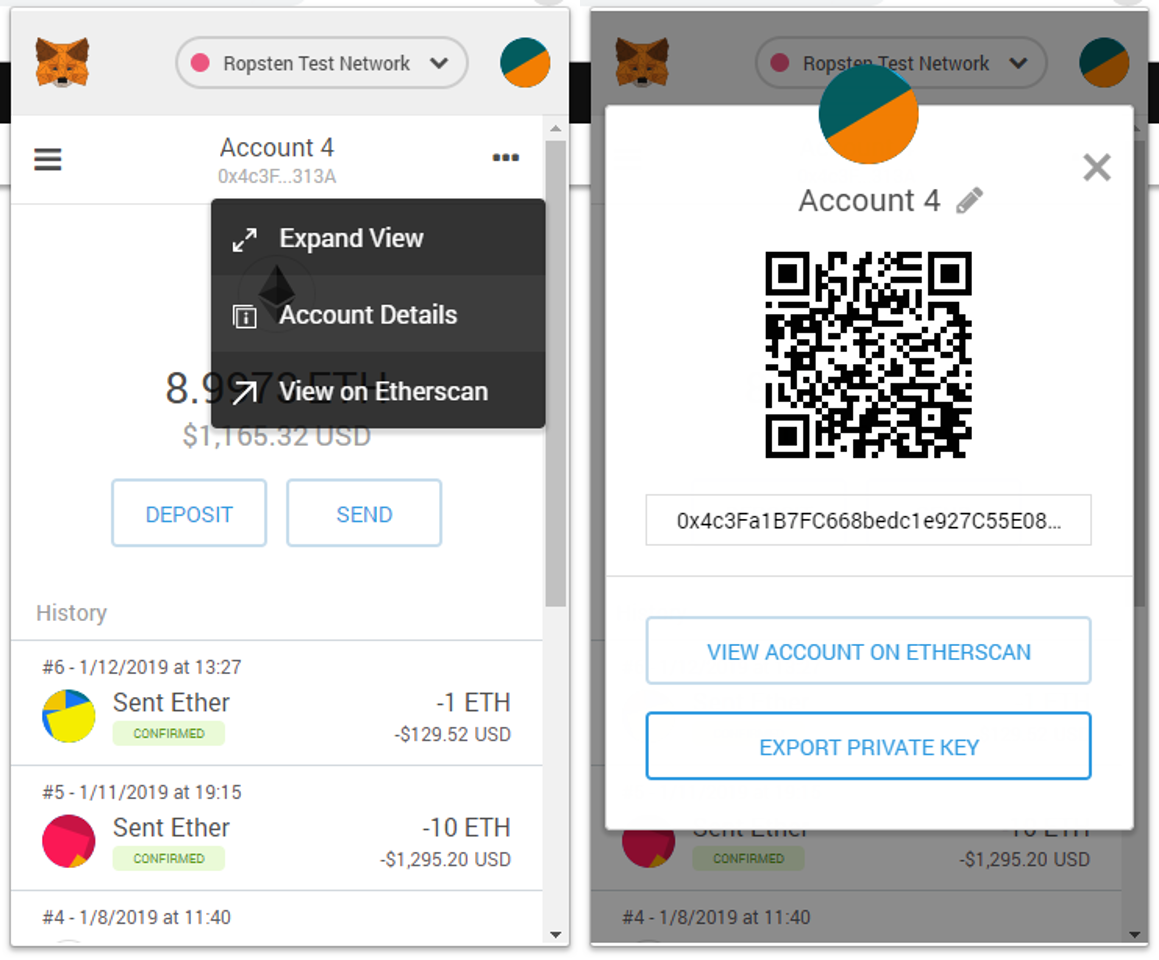
To get your MetaMask wallet’s address, copy the address stated under the name of your account and paste it in MVW under “Wallet Address”.
To get your MetaMask wallet’s private key, click the […] on the right of the account, then select “Account Details”, followed by [Export Private Key]. Copy and paste the private key address under “Wallet key”.

What’s Next?
In part 2 of this tutorial, I will describe how you can build MVW and the libraries that I used. If you just want the codes, you can visit the project’s Github repository here.
Photo by Charles Deluvio ???? on Unsplash
