
Mahesh Murthy has an amazing tutorial to setup an Ethereum environment to develop Truffle Dapps on the Ethereum blockchain. You can read it here. Part 1 of the tutorial explains the architecture of the Ethereum platforms and lets you execute a smart contract via a simple web page that runs locally. The blockchain runs locally using testrpc.
In the second tutorial, Murthy deployed the smart contract on Ropsten, Ethereum’s testnet blockchain and runs a Truffle Dapp web application to allow users to interact with the smart contract. The Dapp runs locally.
This is perhaps the best tutorial I encountered that covers so much ground on Ethereum and DApps development with Truffle.
Objective
My objectives as I embarked on this exercise are as follows:
- Set up an Ethereum development environment on the cloud.
- The Truffle Dapp that allows smart contract execution should run remotely on the web browsers of various users.
- My users should not need to sync their Ethereum wallet to the main network – this perhaps one of the greatest hurdler faced by a developer just starting out in Ethereum development or a user who wants to maintain an Ethereum wallet. (most of us wouldn’t care about historically transactions that has nothing to do with us, we just want to execute the damn contract!)
Google Cloud Platform
Google Cloud Platform’s free tier is a great way to get started. Register for an account. In your console, create a new Compute Engine instance. Use Ubuntu 16.04LTS image. Next, SSH into your server to make all the necessary preparations:
Update Ubuntu.
sudo app-get updateInstall the common essential stuff.
sudo apt-get install build-essential curl git m4 ruby texinfo libbz2-dev libcurl4-openssl-dev libexpat-dev libncurses-dev zlib1g-devInstall more essentials.
sudo apt-get install build-essential checkinstallInstall node js, we need version 6.x, not 7. Make sure you pull in the correct version.
curl -sL https://deb.nodesource.com/setup_6.x | sudo -E bash -
sudo apt-get install -y nodejs
sudo ln -s /usr/bin/nodejs /usr/bin/node
Install npm.
sudo apt-get install npmInstall apache. Our Dapp will be accessible through an apache web server.
sudo apt-get install apache2Firewalls
Configure the VM’s firewall rules to allow the following Protocols/ports:
- tcp:8545 – Geth listens here
- tcp:80 – apache listens here
Updates
While following Murthy’s tutorial, here are what I changed –
It will take a while to sync your Ethereum node to the blockchain. I increased the amount of disk space on my VM to 30GB. As I am running Geth on the cloud and I know that I will need to connect to my Geth instance remotely, I need to change the –rpcaddress parameter from 127.0.0.1 to 0.0.0.0 to accept connections from all sources. This is obviously dangerous as anyone who gets hold of my Ethereum account and password can write to my block. We will fix this later.
geth --testnet --syncmode "fast" --rpc --rpcapi db,eth,net,web3,personal --cache=1024 --rpcport 8545 --rpcaddr 0.0.0.0 --rpccorsdomain "*" --bootnodes "enode://20c9ad97c081d63397d7b685a412227a40e23c8bdc6688c6f37e97cfbc22d2b4d1db1510d8f61e6a8866ad7f0e17c02b14182d37ea7c3c8b9c2683aeb6b733a1@52.169.14.227:30303,enode://6ce05930c72abc632c58e2e4324f7c7ea478cec0ed4fa2528982cf34483094e9cbc9216e7aa349691242576d552a2a56aaeae426c5303ded677ce455ba1acd9d@13.84.180.240:30303"After following Murthy’s instruction to replace the contents of 2_deploy_contracts.js and app.js, and Voting.sol, compile everything with the following command before executing sudo truffle console. You should do this every time you update the smart contract.
sudo npm run buildFree Ether
Smart Contract deployments need Ethers. Here’s where to pick up some to execute and deploy your smart contracts: http://ipfs.b9lab.com:8080/ipfs/QmTHdYEYiJPmbkcth3mQvEQQgEamFypLhc9zapsBatQW7Y/throttled_faucet.html.
Edit migrations/2_deploy_contracts.js to change gas to 500000. Murthy’s default of 290000 is no longer sufficient. Running contracts are serious business, even on a testnet!
More updates
In Murthy’s instructions, he executes the command npm run dev to create the Dapp and start it locally at localhost:8080. This is something I cannot do because my server is on the cloud and you (at least for me) only have SSH access to your (my) server on the cloud. Run this instead to create the DApp and all its associated files in the /build folder.
sudo npm run buildCopy the contents of the /build folder to where your webpages are. For me it’s /var/www/html/. Edit app.js in your build folder to replace all instances of references to localhost:8545 with <your server’s external ip address>:8545. I do this because my Geth instance is accessed remotely. The earlier steps to configure the server’s firewall rules to allow connections via TCP:8545 and to set Geth’s rpcaddress setting to 0.0.0.0 prepares for this. Again, this is really the last thing you want to do in a production environment because anyone who knows your Ethereum account can now execute transactions on your behalf! We will clean this up later.
sudo pico app.jsExecuting Smart Contract
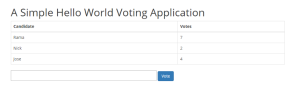
To execute your contract, on Chrome, visit the URL that you have copied contents of the /build folder to. Make sure that Geth is still running on your server. What is really happening here is that you are executing a smart contract using your Ethereum account and doing it through Geth that’s currently running on your server. To see the transactions as they execute, visit https://ropsten.etherscan.io and search your account ID.
You definitely don’t want to do this in a production environment – afterall, what you really want is for each user to execute your contract with their OWN account, and pay for it with their OWN ethers!
This is where MetaMask comes in to do the magic.
MetaMask
MetatMask, in their own words is “a bridge that allows you to visit the distributed web of tomorrow in your browser today”. What this really means is that anyone, with a Metamask Ethereum wallet with some ethers in them, can execute smart contracts on a browser, without first synchronizing an Ethereum wallet to the main blockchain network. This is truly god-send.
Let’s make sure that we aren’t cheating – kill the Geth process:
killall -9 gethEdit app.js to replace every instance of <your_ip_address>:8545 with localhost:8545. Now it’s no longer possible to execute the voting smart contract through Geth.
On MetaMask’s website, install MetaMask’s Chrome plugin.
Change to the Ropsten Test Network – this is where our smart contract was deployed.

Create a new account. Copy the account’s address. Send some ethers to yourself. You will need ethers to execute the smart contract. You can do it here. Hang on for a moment while your amount of ethers gets updated.

Visit your DApp again on Chrome. Now execute the smart contract. Note that MetaMask pops up to confirm if you really wish to execute the smart contract because you need to spend ethers to do that. Confirm it.

Wait for a few seconds so that this gets written to the blockchain. Visit https://ropsten.etherscan.io and search for the account ID that just executed the transaction. Yes it’s you! On ropsten.etherscan.io, click on the contract that was just executed, notice that all the other previous execution of this smart contract was done with your earlier account on only the most recent execution was done with this account.
What’s Next?
With MetaMask, Ethereum and smart contract has come closer to mass adoption. Anyone with some ethers, a Chrome browser with MetaMask set-up and a URL can execute a smart contract. The cloud-based ethereum environment provides an easy way for a developer to deploy and test smart contract. It is also straightforward to switch between the Main Ethereum, the Ropsten Network or a custom RPC.
Photo by Thought Catalog on Unsplash