This is the 3rd of 5 articles to explore the development of an end-to-end Balloting system on Ethereum. In this article, I will demonstrate how the voting DApp works. This is a demonstration you can try.
Do check back often as I work on the rest of the articles in this series.
1. Voting on a Blockchain: How it works
2. Voting on a Blockchain: Solidity Contract Codes explained
3. Voting on a Blockchain: DApp Demonstration
4. Voting on a Blockchain: Ballot Management DApp Code Walk-through
5. Voting on a Blockchain: Voting DApp Code Walk-through
Getting Started
Visit MetaMask to install a digital wallet on your Chrome browser. A digital wallet is where you keep your cryptocurrency.
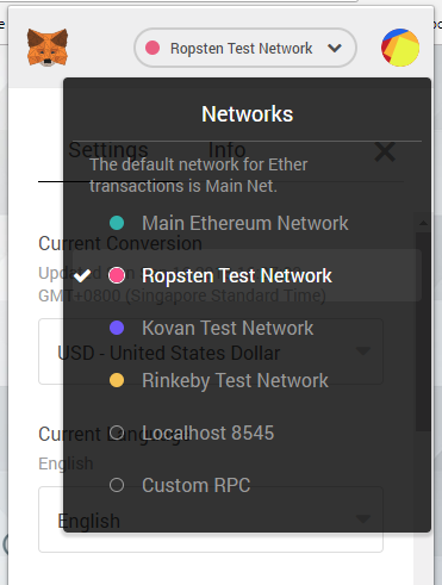
On MetaMask, change the network to “Ropsten Test Network” so that you don’t need to spend real ETH to try this demonstration.

Create 4 accounts on MetaMask:
- Chairman: This guy runs the ballot and sets the proposal for people to vote for.
- Zoe, Ellie, Peter: These folks are the voters
On all 4 accounts, visit the Ropsten MetaMask faucet for some free ETH so that you can run the transactions. You will use around 2 ETH for each account.
There are 2 parts to the Ballot DApp:
- Ballot Manager: Here’s where the chairman deploys new ballot contract and monitors it when people votes.
- Vote: Here’s where votes come to vote for or against the chairman’s proposal.
Setting up the Ballot
The chairman is the main guy in the balloting process who sets up the ballot, fix the proposal and get people to vote for it.

Change your MetaMask account so that it uses the chairman’s wallet.

Now visit the Ballot Manager. Give your ballot official a name (by default we call this guy the chairman) and fix a proposal (by default we ask if Jack is to be re-elected). Press Go to continue.

You will need to confirm this contract deployment transaction. It entails a fee, but since we are on Ropsten testnet, it’s free.

Give it a while. The Ballot Contract eventually gets deployed onto the Ethereum Blockchain network. Notice the 3 sections that appears:
- Contract Details: This is where you get to see the details of this Ballot contract which includes the name of the ballot official, the proposal and the address on the Blockchain where this contract has just been deployed.
- Vote Details: This is where you check the voting results, the total number of voters and the total number of votes cast.
- Voters: As chairman, you can add new voters in this section.

Deciding Who Can Vote
As chairman of this ballot, you now need to decide who your voters are. You would have collected the wallet addresses of Zoe, Ellie and Peter, your 3 voters.

Now enter their names and wallet addresses.Then press [Add] to add it. Here’s for Zoe.

Here’s for Ellie.

And here’s for Peter. Notice that the status of all 3 voters state [Not Voted]. Rightly so, because they haven’t voted yet.

Once all voters are registered, you may now declare that voting has begun as the chairman. Press [Start Voting].

Voters Vote
Imagine that you are Zoe now and you are ready to vote.

Change your MetaMask Wallet to use Zoe’s wallet address. Visit the Voting page. Paste the ballot address that was generated when the chairman deployed this contract. Then press [Go]. This retrieves the details of the ballot in the Contract Details section.
You may now vote [Yes] or [No].

If you switch back to the Chairman’s Ballot Manager screen, you will notice that Zoe has now voted.

It’s time for Ellie and Peter to vote too.

Change your MetaMask wallet to Ellie’s. Paste the Ballot Address in voting screen. Then vote.

Switch back to the Chairman’s Ballot Manager screen and notice that Ellie has voted too.

Now do the same for Peter.

Switch back to the Chairman’s Ballot Manager screen and notice that Peter has voted too.

Ending Vote and Getting Results
Ending the voting process is a task that only the chairman can do.

Change your MetaMask account to point to the Chairman’s wallet. Switch back to the Chairman’s Ballot Manager screen and press [End Voting] to end this voting process.

This ends voting. The results is displayed. In my case, 2 out of 3 people voted “Yes” thus Result says “2”.
Notes that the Vote Detail section also displays the total number of voters and total votes cast.

What’s Next?
In the next part, I will walk through the source codes for Ballot Manager.
Photo by Ming Jun Tan on Unsplash
