This is the 4th and final part of the Ethereum IOT Kid Grounding Device project. In this part, I will focus on describing the process of putting together the PIR sensor to write to the Ethereum Blockchain whenever the kid moves. I will also discuss my thoughts behind this project, explaining where it is lacking and how I could make it better in its next iteration.
You may read part 1 here, part 2 here and part 3 here.
The IOT PIR Sensor

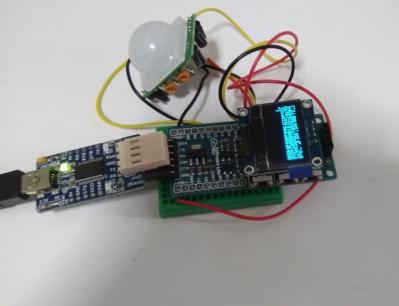
This is the PIR sensor device that I put together. Here are the components if you wish to build one yourself.
- EspressoLite V2
- USB to UART Converter
- I2C OLED Module (you don’t exactly need this, but I use it to display status messages when testing the device)
- PIR Motion Sensor
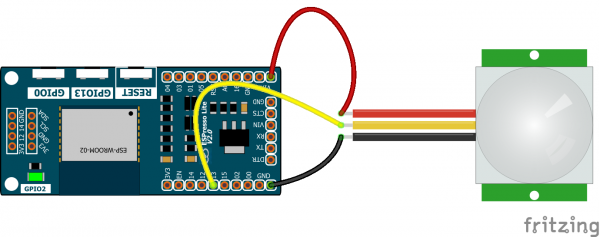
And this is how I hooked them up.

The EspressoLite is a WIFI development board based on Espressif’s ESP-WROOM-02 module. You can program it in Arduino and it cost less to buy than the Arduino Nano.
And here are the codes, which I modified from the PIR sensor sample codes at Adafruit.com. Here are the sections that warrant some attention.
#include <ESPert.h>

ESPert espert;

const char *host = "35.209.171.26";
const int httpPort = 80;
String path = "/move?contractaddress=0x86C9D3aBF13D25CED87C0D00331667AC44c04a89";
These are coded between lines 3 and 9. I included the ESPert library because I am doing this on the EspressoLite board. This PIR Sensor and EspressoLite gadget doesn’t write to the Ethereum Blockchain directly. Instead, it makes HTTP calls to my Node.js web service, specifically the move function here. Thus I declare my Node server’s IP address as the host and httpPort 80. It writes to my Smart Contract on the Ethereum blockchain by calling move on my Node.js web service, thus String path = "/move?contractaddress=0x86C9D...";
int pirPin = 13; // the digital pin connected to the PIR sensor's outputOn line 22, I stated the digital pin that I connected my PIR sensor’s output to – pin 13. Note that in the diagram above, the yellow wire is connected to pin 13 on the EspressoLite.
 if (digitalRead(pirPin) == HIGH) {
    digitalWrite(ledPin, HIGH); // the led visualizes the sensors output pin state
    if (lockLow) {
      // makes sure we wait for a transition to LOW before any further output is made:
      lockLow = false;
      Serial.println("---");
      Serial.print("motion detected at ");
      Serial.print(millis() / 1000);
      Serial.println(" sec");
      espert.println(">>" + espert.wifi.getHTTP(host, path.c_str()) + "<<"); //send movement to server
      delay(50);
    }
    takeLowTime = true;
  }
Lines 62 to 75 checks if a HIGH is sent from the PIR sensor.
A HIGH is sent whenever movement is detected. This is the line of code that does that.
espert.println(">>" + espert.wifi.getHTTP(host, path.c_str()) + "<<"); //send movement to serverHere, the EspressoLite sends a HTTP GET to the Node.js web service to call the move function to write this to the Ethereum Blockchain.
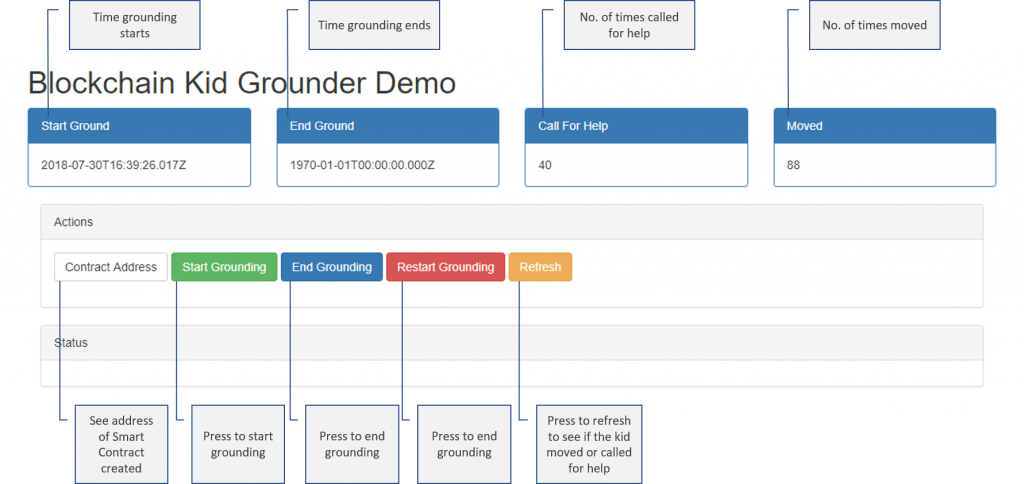
The Kid Grounder Front End

The Kid Grounder Front End is a User Interface that executes the various functions running in my Node.js web service. You can find the codes here:
- The UI: index.html
- The JavaScript codes behind it: index.js
In Retrospect
Kids Grounder was one of those projects that I started without putting much deep thoughts into. I had simply wanted to find out how a project that combines the EspressoLite, a Sigfox Unabell button and Ethereum may turn out. Early in the project, I began to realize why it wouldn’t be very feasible but decided to complete the project anyway because there’s still a considerable amount of learning that I can take away from it. So here are the things that don’t work and how I can improve in its next iteration.
The IOT PIR Sensor
The EspressoLite doesn’t execute transactions directly on the Ethereum Blockchain but sends a HTTP GET to a remote Node.js web service whenever the kid moves. This implementation is problematic because the user needs to keep his Ethereum digital wallet elsewhere. The solution is to have the IOT PIR sensor write directly to the Blockchain, eliminating the HTTP GET call altogether. Someone has written an Arduino library for the ESP32 (I am using the ESP8266) to do just that and I definitely should try it!
The next problem pertains to how quickly Ethereum transactions are verified and mined. Today, it takes about 15 seconds for each block on the Ethereum Blockchain to be mined. So every time the kid moves, I will need to wait an average of 15 seconds before it gets recorded on the Blockchain. And if the kid moves before his previous movement is recorded on the Blockchain, I lose that information unless I can queue it through a message queue. I don’t think I can put a message queue in an EspressoLite!
The Kid Grounder Front End
The decision to write a Front End UI to make AJAX calls to a Node.js backend that in turn, execute transactions on the Ethereum Blockchain is one that I regretted almost immediately. A comprehensive set of JavaScript library called web3.js has always existed for developers to write programs to execute transactions on the Ethereum Blockchain. I could have used it to develop the Front End UI but instead, used the web3.js library in my Node.js backend.
This decision caused me to end up with some rather convoluted user experience in the Web UI. For example, when I pressed Start Ground on the UI, I was only able to tell if the transaction has been sent to the Blockchain successfully, but not when the transaction has been written to the Blockchain. I also needed to repeatedly make calls to the Node.js web service to find out if the kid has moved or called for help.
All these would have been easily achieved using the emit and event watch feature of Solidity and Web3.js with some callbacks.
What was I thinking really…
Photo by Louis Reed on Unsplash
